
Using NiFi is a fresh approach to flow based programming at WebInterpret. What is really nice about NiFi is its GUI, which allows you to keep an eye on the whole flow, checking all of the messages in each queue and their content. The GUI is also used to develop and extend flows. All processes are run in separate boxes called Processors. Data flowing between Processors are called FlowFiles. Each FlowFile has its own Content and Attributes.
Firstly some download and installation materials. You can find downloads here: http://nifi.apache.org/download.html and a quick start guide here to getting set up: https://nifi.apache.org/docs/nifi-docs/html/getting-started.html
Example 1
We will start with a really simple NiFi example: a simple flow generating a FlowFile and logging its attributes in a log file, just to show what is what when it comes to NiFi :)
To create a Processor you have to drag the Processor icon onto the canvas, which opens up the "Add processor" window, where you can apply filters to all existing NiFi Processors. Choose GenerateFlowFile and click "Add".

Fig. 1. Processor Icon.
You now have one Processor used for generating user-specified FlowFiles, which is really useful during the development of NiFi applications. Repeat the steps above, this time choosing LogAttribute instead of GenerateFlowFile. As the name suggests, this sort of Processor is used to log attributes in a log file. We are only going to use it for creating a simple flow, though.
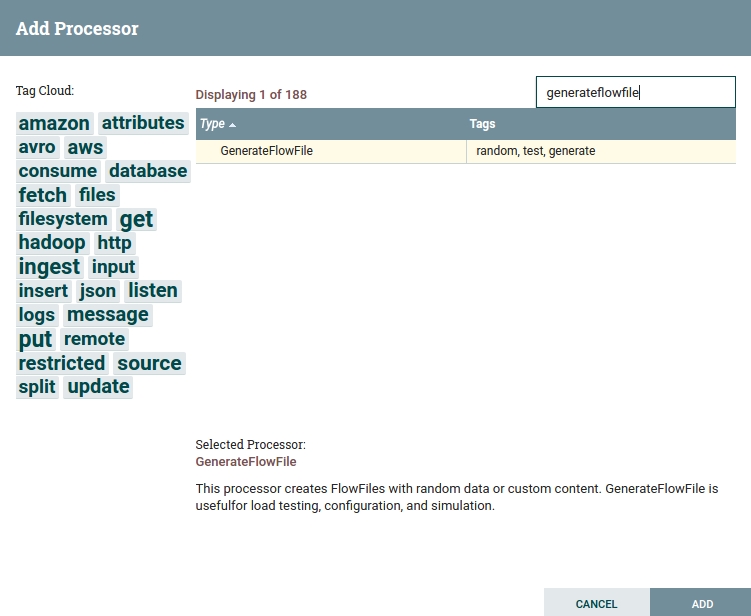
Fig 2. Add processor window.
Now connect GenerateFlowFile with LogAttribute by hovering over the first one and dragging the arrow (the one in a circle) to the second Processor. The "Create Connection" window will appear. You can choose what kind of relationships this connection will work for. Here there is only one kind of connection: "success". Mostly there are at least two kinds: "success" and "failure", plus other user-defined connections. Click "Add" and the connection will be added.

Fig 3. View of first simple flow before confirmation.
Right-click on the LogAttribute Processor box and choose "Configure". The ensuing window gives you the possibility to configure the entire Processor. In "Settings" you can choose such things as the name of the Processor, the interval between runs if the Processor yields, the logging level, and most importantly at the moment: whether FlowFiles coming from a particular input connection should be terminated. Check the box to terminate "success" FlowFiles. Other tabs include "Scheduling" — how often and how many processes will be run, and Properties, where you can edit all Processor-specific settings. For this Processor you can set up at which logging level attributes will be logged (info, warning, error), etc. Click "Apply".
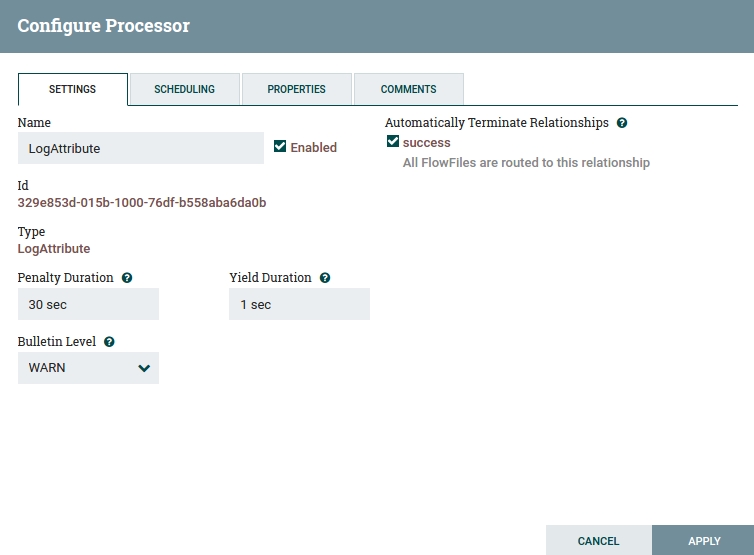
Fig 4. LogAttribute Configuration Window.
Let's also configure GenerateFlowFile. Go to "Properties". In "Custom Text" let's add a simple JSON:
{"company": "WebInterpret"}
and in "Scheduling" change "Run Schedule" to "1 sec". When "Run Schedule" is set at "0 sec", the Processor is run directly after it has finished the previous cycle. If you don't change it your queue will fill up with messages pretty fast — as many as 10 000 in just 3 seconds. At "1 sec", the Processor will be run every second. Click "Apply".
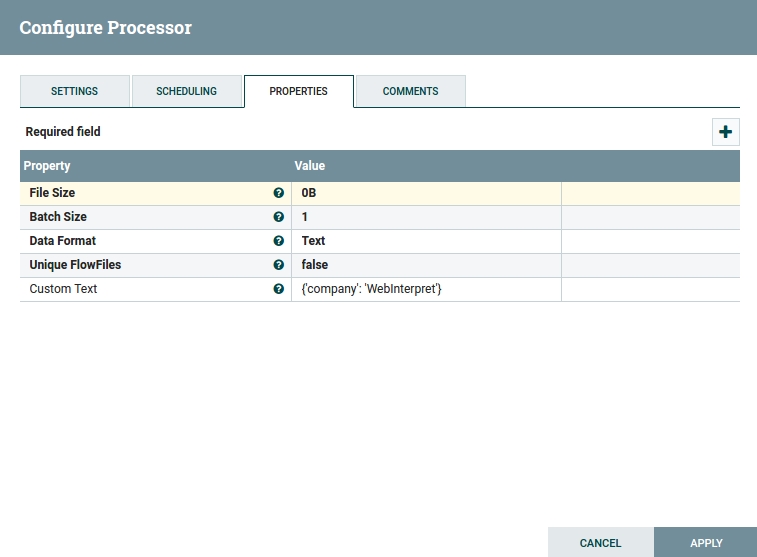
Fig 5. GenerateFlowFile Configuration Window.
You can also configure the connection. Accessing the configuration window works the same way as with Processors. In "Settings" you can establish the maximum number of messages in a queue, maximum data size of messages in a queue, expiration time of messages, and prioritization strategies. Let's leave them as they are.
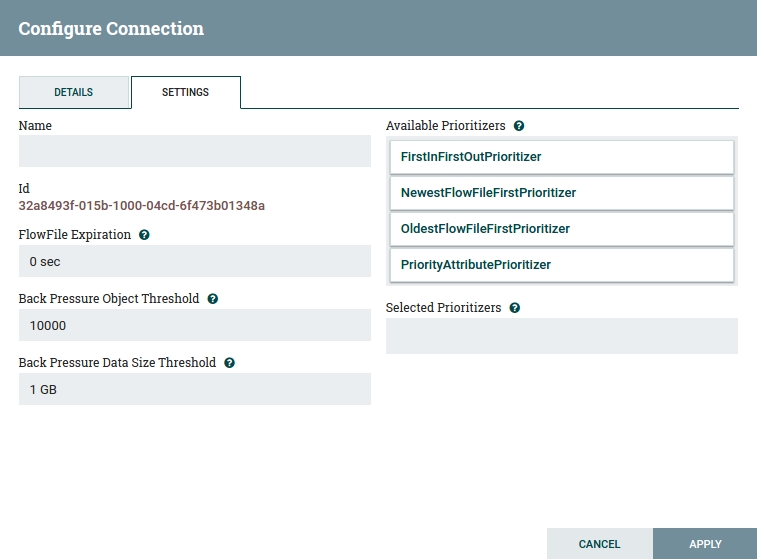
Fig 6. Connection Configuration Window.
Now you can start your first flow. Let’s do it one Processor at a time. Start GenerateFlowFile by clicking with the right mouse button and choosing "Start". The Processor has started and generates FlowFiles with our specified JSON as its content. You may have to refresh the state of flow by right-clicking on the canvas and choosing ‘Refresh’.

Fig 7. View of first simple flow after configuration.
Now you can check the queue. Right-click on Connection again and choose "List queue". You will see all the messages currently in the queue. To check the attributes and content of a message, just click on the information icon in the left column that corresponds to the chosen message. The "Details" tab contains basic information about the time a message has spent in the flow, the filename, id, etc. Click on "View" and you will see the message content – our simple JSON. It's also possible to download it. In "Attributes" you can see most of the FlowFile's attributes like id, filename, whether it was routed by another Processor in a specific direction, whether it was generated with an HTTP request and from whence, etc. We can also add user-specified attributes to various Processors.

Fig 8. Connection Queue Window.
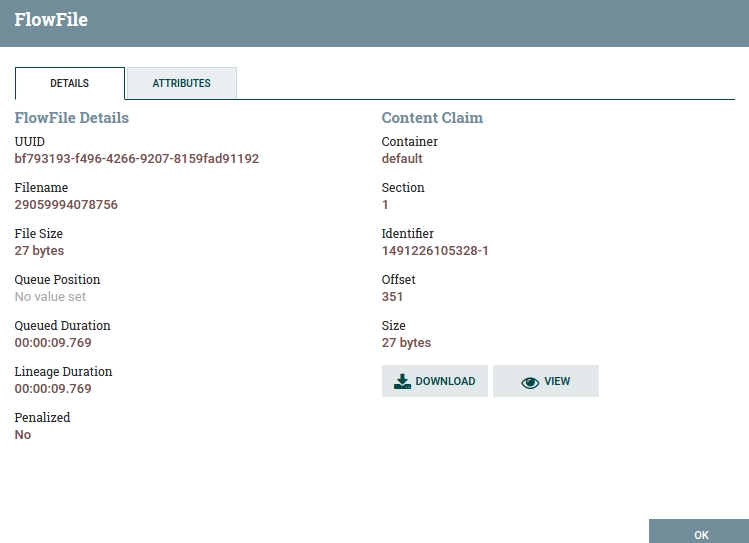
Fig 9. FlowFile Information Window.
Let's go back to our flow and start the LogAttribute Processor. Now the queue will be emptied and you will be able to view the logs in the log file (nifi_folder/logs/nifi-app.log):
Standard FlowFile Attributes
Key: 'entryDate'
	Value: 'Mon Apr 03 15:58:17 CEST 2017'
Key: 'lineageStartDate'
	Value: 'Mon Apr 03 15:58:17 CEST 2017'
Key: 'fileSize'
	Value: '27'
FlowFile Attribute Map Content
Key: 'filename'
	Value: '29061997738881'
Key: 'path'
	Value: './'
Key: 'uuid'
	Value: '3066198c-c83f-49e7-b041-f5fc8327b36c'
Now stop both Processors, starting with the generator. Congratulations, you have made your first NiFi flow! :)
Example 2
Now something more interesting: handling an HTTP request, saving its content to MongoDB and getting a success/failure response.
In MongoDB create a database called test on the localhost and and inside it a collection called test_collection.
Create four Processors: HandleHttpRequest, PutMongo, and two of the HandleHttpResponse. Connect HandleHttpRequest with PutMongo (success). PutMongo should be connected to both HandleHttpResponse Processors, one for "success" and one other for "failure" connections.
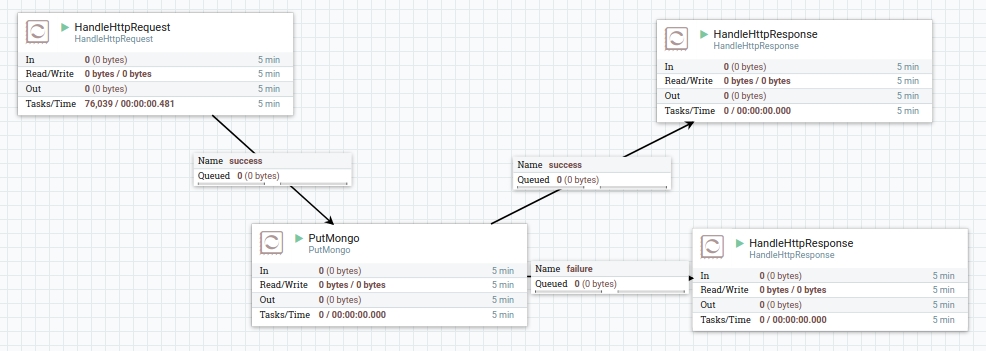
Fig 10. View of flow saving info to MongoDB from HTTP request.
In HandleHttpRequest we configure the following properties: HTTP Context Map should be set to StandardHttpContextMap (if this if the first time you're doing this, you'll need to select "Create New Service"), and "Allowed Paths" should be set to "/test".
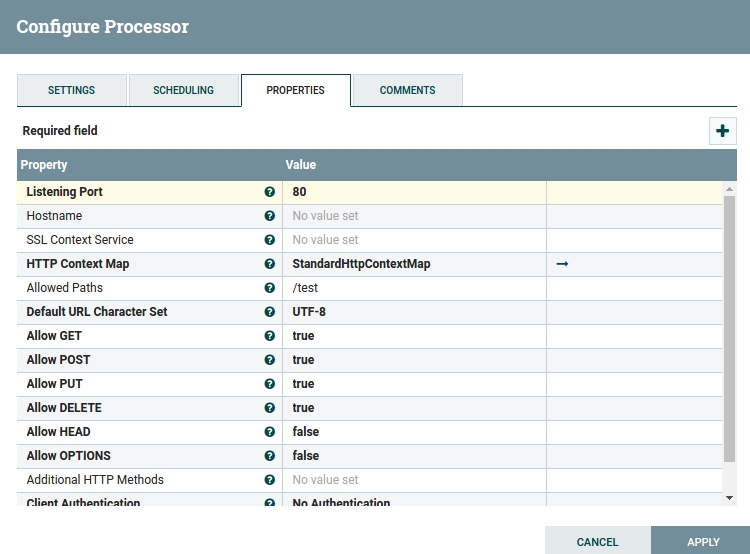
Fig 11. HandleHttpRequest Configuration Window.
In the PutMongo Processor configure the Mongo URL: mongodb://127.0.0.1:27017, Mongo Database Name: test, and Mongo Collection Name: test_collection.
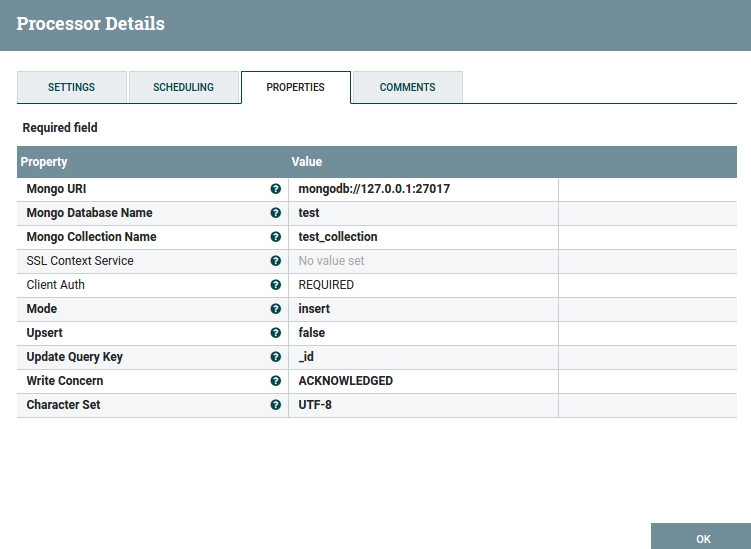
Fig 12. PutMongo Configuration Window.
The "success" HandleHttpResponse should have its HTTP status code set to 200 and the "failure" HandleHttpResponse should be set to 500. Both should have "HTTP Context Map" set to StandardHttpContextMap. If you didn’t create the context map before you have to create it now. Once created it can be used in all other HTTP Processors. To create the StandardHttpContextMap click on the Value field of "HTTP Context Map" and choose "Create new service…" and then "Create". A context map is created but you still need to enable it. There is a small arrow next to StandardHttpContextMap. Click on it. If asked for saving changes in Processor configuration click "Yes". You should now be in the Controller Services list. You should have one service: StandardHttpContextMap. There is a small lightning symbol. Click on it to enable the context map and click "Enable". From now on this context map is available in each HTTP Processor. Now you can go back to your flow and continue configuring other Processors.
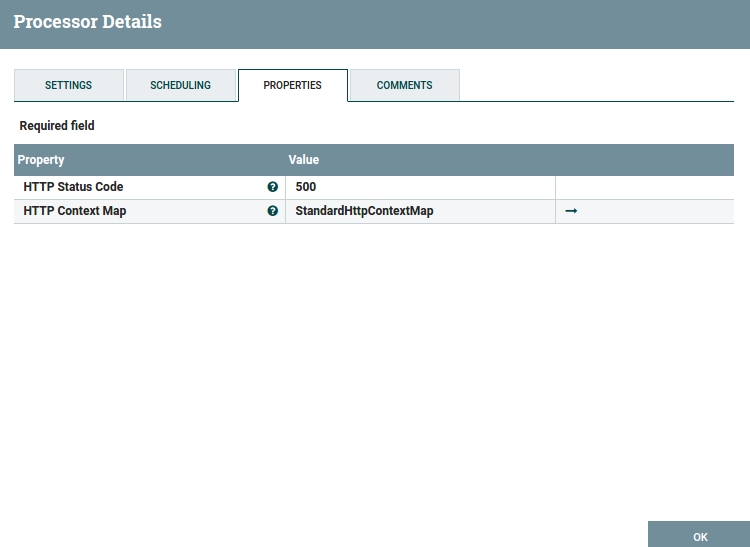
Fig 13. ‘Failure’ HandleHttpResponse Configuration Window.
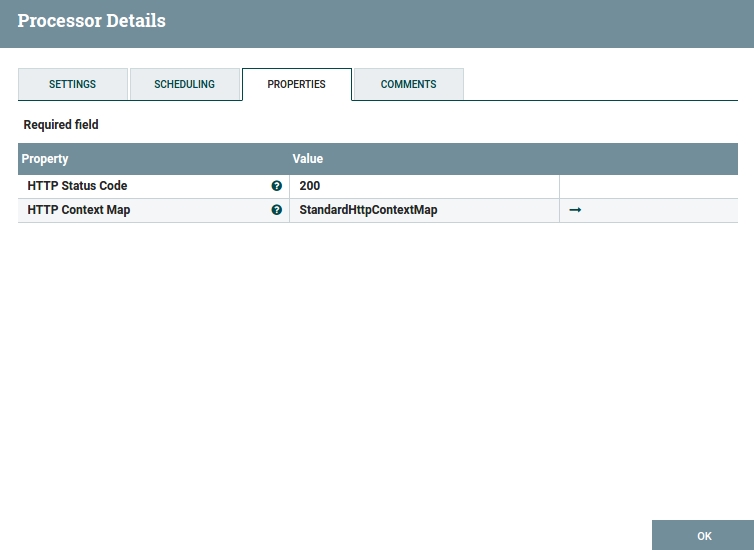
Fig 14. ‘Success’ HandleHttpResponse Configuration Window.
Now run all those 4 Processors, and in the terminal run the following command (if you're running Windows, you can run this from Postman if you have it installed and configured):
curl -H "Content-Type: application/json" -d '{"company": "WebInterpret"}' localhost:80/test -X POST
You should get response:
{"company": "WebInterpret"}
and the same should appear in your mongo collection.
As you can see, it is very easy to create flows using the building blocks provided in the graphical interface. You can keep an eye on the whole flow, and have the possibility to look into queues and peek at messages.
Generally it should be possible to create most simple flows with NiFi built-in Processors, but that is just not enough for everybody. It’s possible to make your own Processors in Java as plug-ins, or in ECMAScript, Groovy, Lua, Python, Ruby (rather their Java implementations, e.g. for Python it is Jython). As WebInterpret is a Python driven company, we have chosen Python scripts, of course. It is possible to run scripts in two NiFi Processors: the ExecuteScript Processor and InvokeScriptedProcessor… Processor.
It is worth mentioning that both script Processors are as yet described as "experimental".
ExecuteScript is quite easy to use and quite well described here: https://community.hortonworks.com/articles/75032/executescript-cookbook-part-1.html
https://community.hortonworks.com/articles/75545/executescript-cookbook-part-2.html
https://community.hortonworks.com/articles/77739/executescript-cookbook-part-3.html
therefore we will just show simple example.
Example 3
What if we need to return the id of a newly created document in our database?
Firstly we need to install Jython. The following link describes how to install Jython:
https://wiki.python.org/jython/InstallationInstructions
The latest stable version is Jython 2.7.0.
You can also try beta version Jython 2.7.1b4: http://fwierzbicki.blogspot.com/2016/02/jython-271-beta3-released.html
Let’s swap the PutMongo Processor for ExecuteScript.
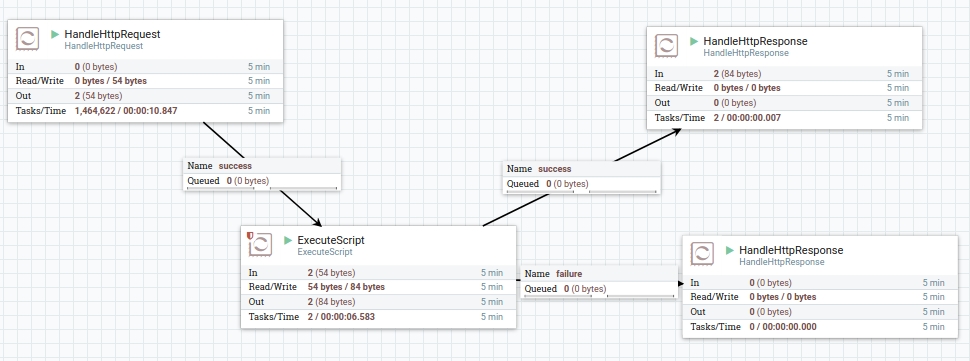
Fig 15. View of flow with customized PutMongo Processor in Jython.
Remember we're going to be running this script in Jython, so you need to have Jython installed for this to work.
Configuring ExecuteScript:
"Script File" should point to the directory of your script. In my case it is: /home/szymon/workspace/wi-nifi/put_mongo.py.
"Module Directory" should point to where the Jython virtual environment is installed, for me it is: /home/szymon/venvs/nifi_jython/Lib/site-packages.
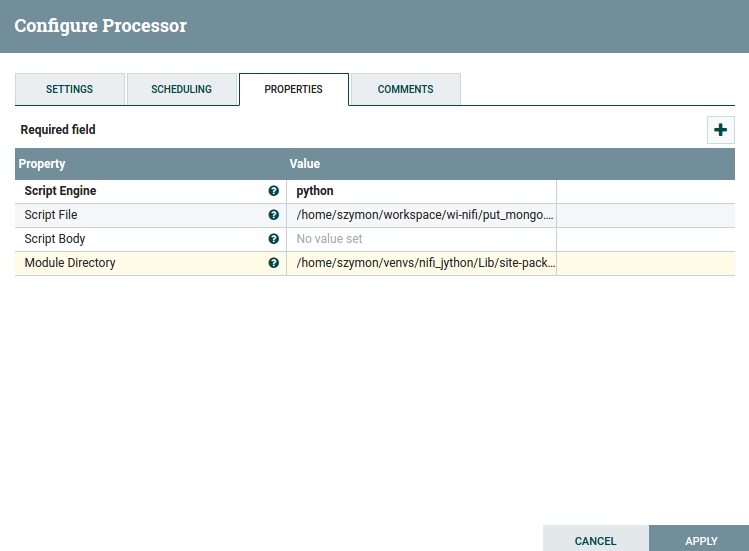
Fig 16. ExecuteScript Configuration Window.
The script in Jython:
import json
import urlparse
from bson import json_util
from pymongo import MongoClient

import java.io
from org.apache.commons.io import IOUtils
from java.nio.charset import StandardCharsets
from org.apache.nifi.processor.io import StreamCallback


class PutMongoPython(StreamCallback):
    def __init__(self):
        pass

    def process(self, inputStream, outputStream):
        input_text = \
            IOUtils.toString(inputStream, StandardCharsets.UTF_8)

        input_document = urlparse.parse_qs(input_text)

        client = MongoClient('localhost', 27017)
        db = client['test']
        collection = db.test_collection
        document_id = collection.insert(input_document)

        outputStream.write(
            bytearray(
                json.dumps(
                    document_id,
                    indent=4,
                    default=json_util.default
                ).encode('utf-8')))


flowFile = session.get()
if (flowFile != None):
    try:
        flowFile = session.write(flowFile, PutMongoPython())
        session.transfer(flowFile, REL_SUCCESS)
    except Exception, err:
        log.error('Something went wrong')
        session.transfer(flowFile, REL_FAILURE)
Let’s try our terminal command again:
curl -H "Content-Type: application/json" -d '{"company": "WebInterpret"}' localhost:80/test -X POST
Now you should get a different answer – the id of the newly created document in MongoDB:
{
    "$oid": "58e349b0de6571020535bd3e"
}
I hope this basic example shows how easy is to make simple Processors in different languages.
ExecuteScript, however, is not that powerful; it outputs one FlowFile at a time.
During our work at WebInterpret we needed to be able to send many FlowFiles in one Processor run. And ExecuteScript is useless at that. What we can do is use InvokeScriptedProcessor. Unfortunately there is no tutorial, so all knowledge about how to write scripts in Jython for that Processor we had to gain through reverse engineering by looking into NiFi Java source code.
Thank you for your time. I hope this peek into NiFi was useful and that it will awaken within you an interest in this new piece of technology :)
tl;dr
Create processor blocks, connect them, and voilà, you have a flow!
Just look at the pictures and have fun with NiFi flows ;)

